
⚠WARNING: To reduce the risk of serious personal injury, turn unit off before making any adjustments or removing/installing attachments or accessories. An accidental start-up can cause injury.
⚠WARNING: Burn hazard. The lens and heatsink get very hot during use. To reduce the risk of burns and fire, do not touch and keep away from combustible materials while in operation. Do not operate without the included diffuser.
Tripod Cover Operation (Fig. A, B)
Before operating the tripod light, the cover must be removed to expose the inner components. Start by releasing the drawstring (13), release the soft cover (12) and bend around the turtle shell (13) rim to make room for the inner components to raise. Once the light assembly is deployed (refer to Tripod Light Setup and Extending the LED Light Head) tighten the soft cover (11) again around the extension poles again to protect the turtle shell from dirt and debris.
Fig. B
Tripod Light Setup (Fig. A)
To set up your tripod light from its collapsed carrying position, hold the carrying handle (15) with one hand then use your other hand to support the extension pole assembly by the light assembly grip (4). While pressing the leg release button (14) , slide the carrying handle (15) down until the legs extend and lock into place.
Be sure the legs are fully extended and locked into position before extending the light head pole by pulling up at the light assembly grip (4) once the base is resting on the ground.
Extending the LED Light Head (Fig. A, C, D)
The height of your tripod light can be adjusted by extending or collapsing the extension poles (5/8).
-
Extend the legs (16) then secure/lock them into position (refer to Tripod Light Setup).
-
Unlock the upper clamp handle (6) and raise the light assembly (1/2/3/4) out of the turtle shell (13). Extend the pole to the desired height.
-
Fully close the top extension latch and make sure the extension pole is locked into place.
-
For more height, unlock the lower clamp handle (9) and extend the light assembly (1/2/3/4) further to the required height.
-
Fully fasten the lower clamp handle (9) and make sure the extension pole is locked into place.
Fig. C .jpeg?width=300&height=300&name=DXBL30%20User%20Manual%20-%20Extending%20the%20LED%20Light%20Head%20(FIG.%20A%2c%20C%2c%20D).jpeg)
NOTE: Over time, the latches may loosen. If this happens, open the clamp handles (6/9) and hand-tighten the screws (12) (Fig. D). Do not over-tighten, as that could damage the latches.
Fig. D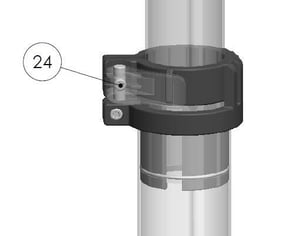
Collapsing and Carrying the Tripod Light (Fig. A, B)
When ready to collapse the system again for storage/transport, release the soft cover drawstring (12) and bend around the turtle shell (13) rim to make room for the light assembly to collapse into the turtle shell (13).
⚠CAUTION: Keep hands and fingers clear when collapsing the light head back into the housing to avoid pinching of fingers and hands.
To collapse your tripod light into the carrying position, first collapse the extension poles (5/8) so the light head rests in the lowest position and is inside the housing. Lock the latches (6/9) . Press the leg release button (14) and slide the carrying handle (15) up until the legs fold in completely.
⚠CAUTION: Keep hands clear of the legs as they collapse to avoid pinching of fingers and hands.
Finally, cover the light assembly with the soft cover (11) and re-tighten the soft cover drawstring (12) to protect the internal components from dirt and debris for storage/transport.
Storing the Tripod Light (Fig. A, B)
Store your tripod light either in its closed carrying position (refer to Collapsing and Carrying the Tripod Light) lying on its side, or standing vertically with the legs extended.
⚠CAUTION: Do not store the light vertically when in the closed position as it could tip over causing injury or damage to the light.